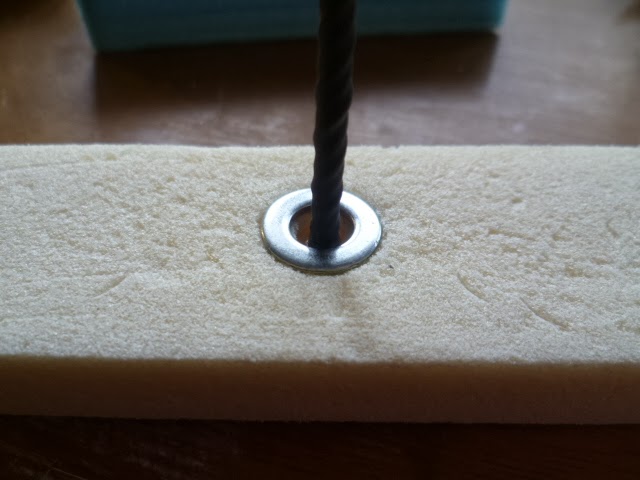
After assembling the armature and shaping the foam all I had to to was glue it all together. I used B&Q's own two part re-positionable epoxy (which I highly recommend, its pretty inexpensive and super strong when mixed correctly) to glue the armature into the foam. I then used UHU glue to stick the soft blue foam and the hard yellow foam together. Next post will be shaping the head.
Tuesday, 12 November 2013
Sunday, 3 November 2013
Compleated armature
I realized that I hadn't posed a photo of the finished armature on it own. So here it is, in all its shiny glory.
He's got an arm off!
I was having some problems with the arms and legs falling off of my puppet until I remembered that someone mentioned 'dinking' the k&s. All that needs to be done is lightly dent the k&s to create some friction between the two peices.
The top photo show my test piece. I originally dented the k&s when both pieces were together. I underestimated how soft the brass was and had a tough time getting them apart again, which is no good if you need to quickly replace a broken appendage.
For my second attempt I only dented the outer piece of k&s, this worked much better. The pieces hold together well and only need a gentle tug to pull them apart.
Saturday, 2 November 2013
Minor alterations
I finished the legs this morning. They are a little bit longer than I intended because I decided to give the puppet knees. I also added some Milliput to give the feet to make them stronger and to give them the right shape.
I added a washer the the foam at the base of the spine because I found that the wire had started to wear the foam away. I figured this was the simplest and fastest way of fixing the problem.
I reinforced the pelvis section of the armature with Milliput. I wouldn't normally do this but I felt that the epoxy glue I normally use was enough the cope with the stress of moving four legs and the spine on its own.
Foam
I started shaping the hard foam to accommodate the K&S armature sections. This is always the messiest part of the project for me. I know that in a weeks time I'll still be finding foam dust in my tool box. The piece of foam in the photo directly below will hold the pelvis of the armature.
The piece of foam in the photo below will hold the torso section of the armature. I managed to break the foam during my first attempt so I had to re think how the K&S would sit inside the foam and what you see below is the second attempt.
I still need to shape the outside of the foam to give it a softer/friendlier shape. As you can see below the K&S fits quite snugly into the foam, all I need to do now is glue it into place.
Wednesday, 30 October 2013
The Armature
A few days ago I started to put together the armature.
I made a few changes to my original plan along the way like using K&S instead of electric block in the pelvis.
The majority of the pieces have been cut to the correct size but I have held back on gluing it all together. This is because I am unsure how far the armature will sit inside the foam I will be using to pad out the puppet. Once I have cut the foam to size I will make allowances in the wire to ensure the arms and legs are the correct length on the exterior of the puppet.
Wednesday, 23 October 2013
CW 2 Pre Production Minor Project
Well it's been a while but I'm finally blogging again.
The pages above are all pre-production for our latest project.
We were given a sound clip and a child's drawing and told to develop and then animate the character.
Subscribe to:
Posts (Atom)