Friday 17 May 2013

Final Animation

Hello lovely people. So here the final animation of my character. We had to animate a walk cycle, a trait/something your character does, lip sync on its own and lip sync combined with a performance.

My walk cycle is just terrible it makes me shudder when I watch it. It looks as if his feet are sticking to the floor. I think the one on this video was my 13th attempt, however it's much, much better than my 1st attempt. I would have tried a few more times to improve it but I had to move on to the trait.


I'm slightly disappointing with the quality of the video because in the trait section you cant see that my character is holding and pressing a button on a remote control.


Lip sync. I had a lot of fun doing this, some of  the mouth shapes too exaggerated but everything is correctly timed and it works quite well.


Final performance. I apologies for the light changes in this part (I was animating at home and couldn't cover the window properly)
. Despite the flickery light problem this actually turned out quite well, considering it was my first attempt. A few people pointed out that I 'twin' my arm movements too much so that's something I'll try to avoid in the future. I hope you enjoyed watching. Any comments on things I could improve upon are very welcome :)

I'd also like to thank James Stafford for providing my characters wonderful voice
 

Saturday 11 May 2013

Final set up

The last week of the project we were evicted from the animating room in university. The Horror!
I joke. We were given plenty of warning that the second and third years would need the room at some time in the near future and if we could make some space for them. Thanks to my dad Tony his amazing D.I.Y. skills and refusal to throw away bits of wood he helped me put together this small animating table.
This photo actually shows the set up for my final animation.

What a fancy man

I would love to say at this point that the build was finished. But seeing as I'm posting all this after the animating was done I can tell you that I had a few issues with my puppet.
I really underestimated how strong the ankles had to be to support the weight of the puppet. I think I rebuilt the feet and ankles at least three times during animation. I eventually purchased some larger K&S to accommodate thicker aluminium wire.
I also found him hard to animate due to the squishyness of the foam I used to pad him out.  I had to strip him down a second time and add some denser foam to his torso and hips to

give me something firmer to grip when moving him.

Creepy Face


Face! Made from super sculpy with a core of rolled up foil.
I was worried that the scuply might not bake correctly in the oven because I made it quite thick in some areas. It turned out okay though. I also make a few replaceable mouth parts for the sound sync section of my project.
He will have eyebrows and eyelids later on to make him look less googly eyed.

Leg Wobble

At this point I had a bit of a play with my model and found that his legs were somewhat wobbly.
I was forced to undress and de-foam him to remake the leg connection. I don't know why I didn't do it like this in the first place.

Clothing


Once again I missed some photos. Duh. Before clothing my model I padded him out using foam which was a pain to do but I got there.
His costume consists of trousers, felt waist coat and a shirt.
At this point I want to thank my wonderful Aunty for lending me her sewing machine, without it I would have been lost.
The shirt is made in three parts to make dressing him easier. The sleeves and the collar are all separate pieces.
I also made some tiny buttons from super sculpy clay to add a bit of detail to his waist coat.

Hands


Thanks to the 2nd year blogs, I managed to work out the process of making a two part mold to cast my latex hands.
There are a few photos missing from here because like a Muppet I forgot to charge my camera.
Amazingly they turned out pretty well on my first attempt, nothing broke or spilled or cracked.
There are a few things I will be doing differently next time though. Such as making the fingers longer to get a better range of motion and making the armature out of stronger wire so the fingers stay in place when they are moved.
In the last photo you can see the hand is a wonderful fleshy colour, unfortunately it started to turn brown/yellow as time went on. I later found out that I should have added some paint to the latex to get the colour I desired.

The Build

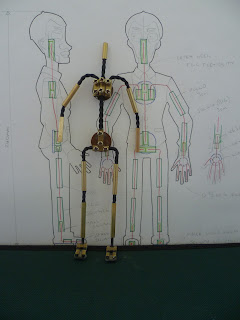
Here's the completed armature for my character, put it together in the Easter holidays in preparation to begin filming when we return.

It took me a week to source and purchase all the materials and spent far too much money doing so. I really feel that the university should be providing materials for us.


Anyway my armature is made from twisted aluminium wire covered in black shrink wrap, which is glued into K&S tubing.
I made the feet, hands and head detachable using K&S.
For the torso and hips I used the inside of an electrical connection block.

I'll be making the hands next. I shall be casting them in liquid latex something I have never done before. Wish me luck.